
Welcome to Your Color Class: Let’s Brighten Things Up! ( frosted tips )
i’m not looking for the same amount of lift that i am up front so i’m allowing for less saturation back here hello good morning good afternoon good evening whatever time of day it is happy to see you my name is Sumit hair i’m here with fse live for your wednesday color class and today we’re going to be going over some really nice handcrafted highlights for super short hair
Why Brighter Around the Face Works Best!
the look of this is going to be brightest around the face which is what you’re going for when you’re trying to get that sun lightened effect because
that’s the hair that sees the sun the most all right so one of the things that you’re going to want to be looking out for when it comes to this type of highlighting is the hair that’s the longest in the haircut because just like
Think Small: Highlight Strategy for Short Cuts!
when you’re doing long balayage and thinking about how those ends they’re older they would have seen the sun more so they would be lighter than everything else this is the exact same thing just shrunk down into something smaller uh so we’re gonna get quicker transitions to get that nice sun lightened effect so
Choosing the Right Product: Paul Mitchell Skylights!
frosted tips. i’m going with paul mitchell skylights it’s great to work with it’s got great consistency a good predictable lift which is always important volume because we don’t mess around put in exactly that much developer so here’s my toothpaste consistency all right this time paddle’s big because we’re actually going to
Let’s Get Practical: Paddle Work and Application!
use the paddle as part of the tool for doing this so this is going to be about timing so this is going to be a technique that i’m going to teach you’re not just going to slap something on their head and then go have lunch you’re actually going to need to kind of hang out or keep a timer because every few minutes you’re going to go in and add more to this so that you can create a very dimensional look in just one visit so i know that i’m going to
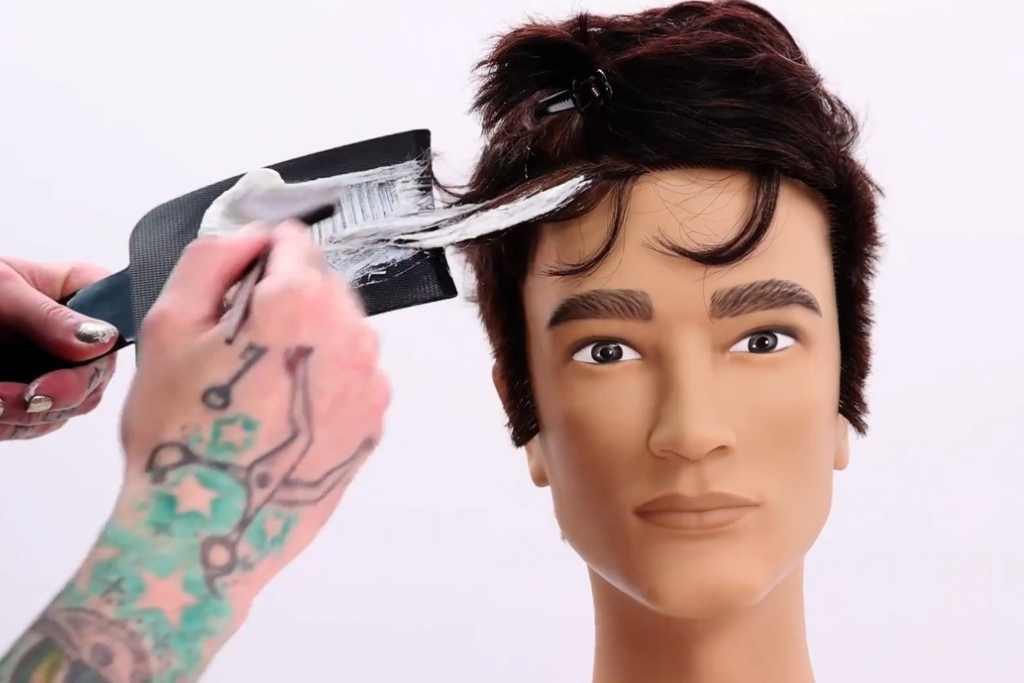
Focus Areas First: Light Up the Front?
Startup by the face so i got my paddle loaded up i’m trying to keep my product off to one side so that i can use the other side as the tool so again this is going to be just all of the balayage tricks that
we’ve ever learned as far as application goes just on really short hair and then we’re gonna just work back as far as you want to again create that visual in your mind of how you want this light to sit when it’s all done i want it real light up around the face.
Build as You Go: Layer Two of Highlights?
i’m going to go ahead and apply all of that now focusing again more on my ends so again i’m looking at this and like okay we’re covered here on this side let’s start bringing it across this hairline now so don’t worry about necessarily making
it too blonde right now we’re really just creating focused areas where the highlights will be the brightest because eventually we’re going to come through and have lightner on most of the top of this head but i want these to be really focused highlights once everything has been busted up so i’m just going to turn my model to hit this last front piece that’s coming from over on this quadrant of the haircut because i want this to process for a good solid few minutes on its own because this needs to be
Creating a Natural Gradient: Transition to the Back?
lightened than everything else on the head then we’ve now begun highlighting this so you want to start stepping back into the hair now is when i would look at this haircut or the rest of this haircut and start finding any areas of it where the hair is a little bit longer and would probably see more of the sun so i’m seeing up here where it is we’ll be getting some sun exposure up top but there are some areas where it’s a little bit longer style wise and i think it’ll just look cooler to hit those first
Surface Highlighting Technique: Subtlety is Power?
i’m not focused on getting all the way down to the root with those highlights this is going to be really just hitting those ends because just like this i want this to be lightest i want the ends to be the lightest part throughout the rest of the haircut when you’re painting these try to be mindful of going in with your brush parallel to the highlight and not perpendicular just with the tip of the brush i’m just looking to see what i can grab because there’s hair that’s already in a highlight all right leave it alone so i’m flicking (frosted tips)
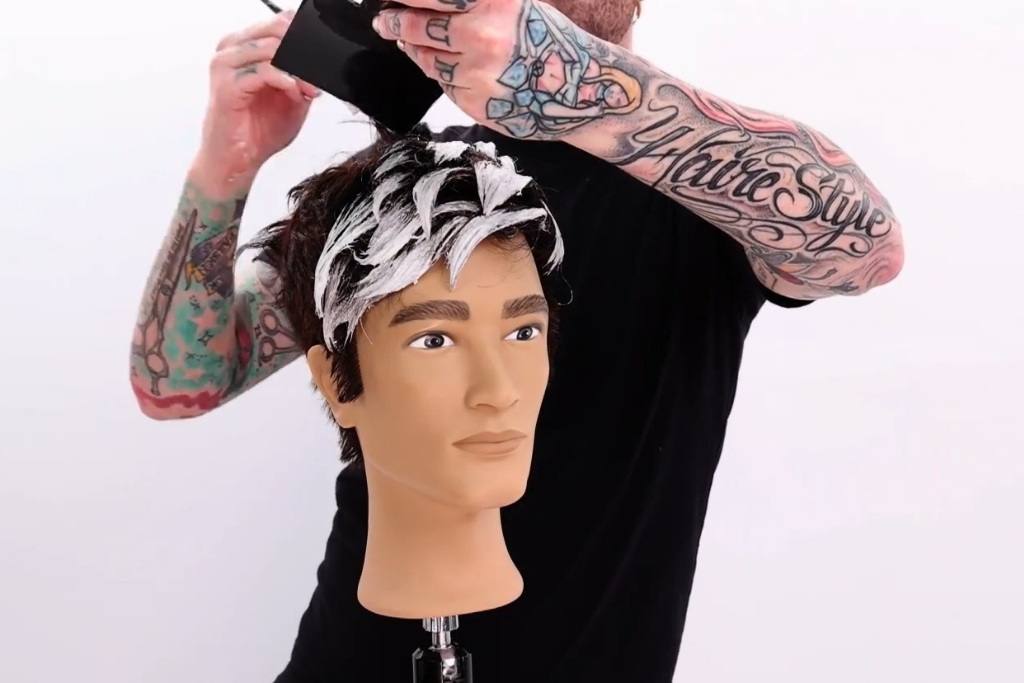
I say all right here’s some hair that i can get to highlight i’m gonna do it grab it use the end of the paddle to hold it uh all right so i’ve gone through now and think of this as like level two so i’ve got my level two highlights in here if you wanna jump overhead i didn’t come all the way into the backpack because this is the stuff that i’m gonna need to transition my super bright front into the untouched back so i’m not really looking to have anything super bright back here so i’m really going to wait and
highlight this stuff last so now you’ve gone and you’ve processed your guest in salon reality with this most of this would be dry so this next step would be a little bit different since it’s all so wet right now it might be a little lumpy but you’ll get the idea uh all right so we’re going to load up you’ve
Final Processing: Watch the Clock?
frosted tips ) now let it sit 10 minutes of processing with 40 under whatever kind of heat source you got going on so now we’re going to really start getting into the nitty-gritty because we need to get moving because you

- still have other things to do so this is starting to get nice and light so use your paddle or tool of choice i’m reapplying to some of these areas going a little bit deeper with the highlights so ( frosted tips ) i’m coming into this top here and seeing i should probably go a little deeper with this highlight and now i am going to go ahead and do some nice surface highlights not can i’m not focused as much on my saturation back here because just like i would teach in you know a long hair balayage class you can dictate how much lift to expect
by your saturation so again like i said in the back i’m not looking for the same amount of lift that i am up front so i’m allowing for less saturation back here that’s what this looks like that’s that’s the consistency you want i’m like actually waiting five minutes i’m just gonna come around so you can see now we’re starting to get more highlights in the back but they’re nowhere near the uh saturation that the front demands so
Finishing Touches: Bumping It Up?
after you process this you could either be done i like to really go in and make sure from this point that i give it one last like what i did with my uh my pre-done like all right it’s pretty much done you know what
Final Look: Sun-Kissed, Natural, and Modern? frosted tips
let’s go in and really just bust everything up to make sure that i’m getting that last little touch of dimension and then i’m gonna start breaking it up just to push it in a new direction not so much for any other reason than to see if there’s anywhere that has clearly been missed sort of just picking it through to make sure that there’s no areas that have been completely ignored because
Bonus Tip: Fortnite Building Tips for the Multitasker?
that will stick out like a sore thumb so now this should hopefully make a little bit more sense to show you the dimension that we’ve created like you’ve still got that base of the natural dark in there but then you’ve got these areas where it’s just been lightened like a little bit some areas where it really must have just gotten like a little bleach dust on it to have busted that base a tiny bit and then you’ve got your areas where the hair is a little bit longer and i’ve lifted the ends to get as bright as we can you frosted tips )
Bonus Tip:
frosted tips. While your hair is Mentioning why not level up in another area? If you a gamer here’s a quick plug: mastering Fortnite Constructing tips can be just like layering highlights, it all about structure timing and finesse. whether you stacking walls or stacking foils scheme is everything


